![]()

ABX00087 UNO R4 WiFi 開發板
使用 Arduino UNO R4 WiFi + ADXL345 + Edge 實現板球擊球識別
衝動
本文檔提供了使用 Arduino UNO R4 WiFi、ADXL345 加速度計和 Edge Impulse Studio 建立板球擊球識別系統的完整工作流程。該專案包括採集加速度計資料、訓練機器學習模型,以及將訓練好的模型部署回 Arduino 以進行即時擊球分類。
本項目中考慮的板球擊球方式:
– 封面球
直驅
拉射
第 1 步:硬體需求
– Arduino UNO R4 WiFi
– ADXL345 加速度計(I2C)
跳線
– 麵包板(可選)
– USB Type-C 數據線
步驟 2:軟體需求
– Arduino IDE(最新版)
– Edge Impulse Studio 帳戶(免費)
– Edge Impulse CLI 工具(需要 Node.js)
– Adafruit ADXL345 庫
步驟 3:連接 ADXL345
如下將 ADXL345 感測器連接到 Arduino UNO R4 WiFi:
VCC → 3.3V
接地 → 接地
SDA → SDA (A4)
SCL → SCL (A5)
CS → 3.3V(可選,用於 I2C 模式)
SDO → 浮空或接地
步驟 4:準備 IDE 感測器
如何在Arduino IDE中安裝感測器庫?
打開 Arduino IDE
開啟「工具」→「管理庫…」並安裝:Adafruit ADXL345 Unified 和 Adafruit Unified Sensor
(如果您使用的是 LSM6DSO 或 MPU6050:請分別安裝 SparkFun LSM6DSO、Adafruit LSM6DS 或 MPU6050。)
步驟 5:用於資料採集的 Arduino 程序
將此程式上傳到您的 Arduino UNO R4 WiFi。它以約 18 Hz 的頻率,以 CSV 格式 (x,y,z) 傳輸加速度計數據,用於邊緣脈衝檢測。
#包括
#包括
Adafruit_ADXL345_Unified accel =
Adafruit_ADXL345_Unified(12345);
無效設定(){
串列.開始(115200);
如果 (!accel.begin()) {
Serial.println(“未偵測到 ADXL345”);
而(1);
}
accel.setRange(ADXL345_RANGE_4_G);
}
無效循環(){
sensors_event_t e;
accel.getEvent(&e);
Serial.print(e.acceleration.x);
Serial.print(“,”);
Serial.print(e.acceleration.y);
Serial.print(“,”);
Serial.println(e.acceleration.z);delay(55); // ~18 Hz
}
設定邊緣脈衝

步驟 6:連接到 Edge Impulse
- 關閉Arduino串口監視器。
- 運行命令:edge-impulse-data-forwarder –frequency 18
- 輸入座標軸名稱:accX、accY、accZ
- 為你的設備命名:Arduino-Cricket-Board
- 在 Edge Impulse Studio 的「設備」下確認連線。


步驟7:數據收集
在 Edge Impulse Studio → 資料擷取中:
– 設備:Arduino板
– 感測器:加速度計(3軸)
– Samp長度:2000 毫秒(2 秒)
– 頻率:18 Hz
至少記錄 40 秒amp每班費用:
– 封面球
直驅
拉射 收集資料範例amp萊斯
蓋驅動器
設備:Arduino板
標籤:封面驅動器
感測器:三軸感測器(accX、accY、accZ)
Samp長度:10000毫秒
頻率:18赫茲
Examp原始數據:
accX -0.32
accY 9.61
accZ -0.12
直驅
設備:Arduino板
標籤:直驅
感測器:三軸感測器(accX、accY、accZ)
Samp長度:10000毫秒
頻率:18赫茲
Examp原始數據:
accX 1.24
accY 8.93
accZ -0.42
拉射
設備:Arduino板
標籤:拉射
感測器:三軸感測器(accX、accY、accZ)
Samp長度:10000 毫秒
頻率:18赫茲
Examp原始數據:
accX 2.01
accY 7.84
accZ -0.63 
步驟 8:脈衝設計
開啟創建脈衝:
輸入模組:時間序列資料(3 個軸)。
視窗大小:1000 毫秒 視窗增量(步長):200 毫秒 啟用:軸、振幅(可選)、頻率 18。
處理模組:頻譜分析(又稱運動頻譜特徵)。視窗大小:1000 毫秒。視窗增量(步長):200 毫秒。啟用:座標軸、幅度(可選),首先保留所有預設值。
學習模組:分類(Keras)。
點選儲存衝動控制。 
生成特徵:
進入光譜分析,點選儲存參數,然後產生訓練集的特徵。

訓練一個小型模型
前往 Classifier(Keras),並使用類似這樣的簡潔設定:
神經網路:1-2 個全連接層(例如,60 → 30),ReLU 活化函數
時期:40–60
學習率:0.001–0.005
批次大小:32
資料劃分:80/20(訓練集/測試集)
保存並訓練數據
使用保留集評估和檢查模型測試。
檢查混淆矩陣;如果圓圈和向上重疊,則收集更多樣化的資料或進行調整。
頻譜參數(視窗大小/雜訊基底)。
步驟 9:部署到 Arduino
轉到部署:
選擇 Arduino 函式庫(C++ 函式庫也可以)。
啟用 EON 編譯器(如果可用)以縮小模型大小。 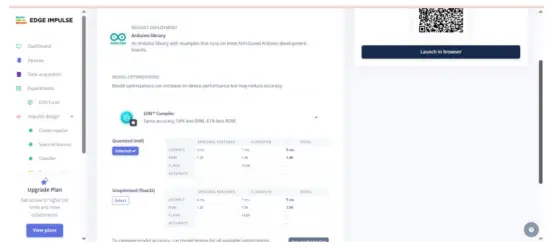 下載 .zip 檔案後,在 Arduino IDE 中:草圖 → 包含庫 → 新增 .ZIP 庫… 這會新增範例amp類似靜態緩衝區和連續緩衝區 File → 前amp萊斯 →
您的專案名稱 – Edge Impulse。適用於 Arduino UNO EK R4 WiFi + ADXL345 的推理草圖。
步驟 10:Arduino 推理草圖
#包括
#包括
#包括// 替換為 Edge Impulse 標頭
Adafruit_ADXL345_Unified accel =
Adafruit_ADXL345_Unified(12345);
static bool debug_nn = false;
無效設定(){
串列.開始(115200);
while (!Serial) {}
如果 (!accel.begin()) {
Serial.println(“錯誤:未偵測到 ADXL345”);
而(1);
}
accel.setRange(ADXL345_RANGE_4_G);
}
無效循環(){
float buffer[EI_CLASSIFIER_DSP_INPUT_FRAME_SIZE] = {0};
for (size_t ix = 0; ix < EI_CLASSIFIER_DSP_INPUT_FRAME_SIZE; ix +=
3) {
uint64_t next_tick = micros() + (EI_CLASSIFIER_INTERVAL_MS *
1000);
sensors_event_t e;
accel.getEvent(&e);
buffer[ix + 0] = e.acceleration.x;
buffer[ix + 1] = e.acceleration.y;
buffer[ix + 2] = e.acceleration.z;
int32_t wait = (int32_t)(next_tick – micros());
如果 (wait > 0) delayMicroseconds(wait);
}
signal_t 訊號;
int err = numpy::signal_from_buffer(buffer,
EI_CLASSIFIER_DSP_INPUT_FRAME_SIZE,&signal);
如果 (err != 0) 返回;
ei_impulse_result_t result = {0};
EI_IMPULSE_ERROR res = run_classifier(&signal, &result,
debug_nn);
如果 (res != EI_IMPULSE_OK) 返回;
for (size_t ix = 0; ix < EI_CLASSIFIER_LABEL_COUNT; ix++) {
ei_printf(“%s: %.3f “, result.classification[ix].label,
result.classification[ix].value);
}
#如果 EI_CLASSIFIER_HAS_ANOMALY == 1
ei_printf(“異常值:%.3f”, result.anomaly);
#endif
ei_printf(“\n”);
}
輸出前amp樂:
 尖端:
尖端:
請確保 EI_CLASSIFIER_INTERVAL_MS 與資料轉發器的頻率保持同步(例如,100 Hz → 10 ms)。 Edge Impulse 庫會根據您的脈衝自動設定此常數。
如果您想要連續檢測(滑動視窗),請從連續檢測範例開始。ample 包含在 EI 庫中,並在 ADXL345 讀取中進行交換。
我們很快就會添加視頻教程;在此之前,敬請期待—— https://www.youtube.com/@RobuInlabs
如果您還有疑問,可以觀看 Edged Impulse 製作的這段影片: https://www.youtube.com/watch?v=FseGCn-oBA0&t=468s
![]()
文件/資源
 |
Arduino ABX00087 UNO R4 WiFi 開發板 [pdf] 使用者指南 R4 WiFi、ADXL345、ABX00087 UNO R4 WiFi 開發板、ABX00087、UNO R4 WiFi 開發板、WiFi 開發板、開發板、板 |